Initializing a Vagrant Development Environment

In this article, we’ll discuss Vagrant Boxes, pick a specific box that matches our target production environment, and create our base Vagrantfile.
Some Requirements
If you haven’t already, make sure to install VirtualBox and Vagrant. You’ll need them in order to follow along with this article. In this series, we’re using version 2.2.14 of Vagrant and 6.1.16 of VirtualBox.
Vagrant Boxes
Vagrant uses “boxes” which are the package format for Vagrant environments. These boxes can be gigabytes in size but the bulk of the box is an image of the hard drive in it’s initial state.
A list of possible boxes can be found on the public Vagrant box catalog. When picking a box it should match the version of whatever operating system will be installed on our production environment so we can reduce those “works on my machine” bugs. We’re going to use the generic/ubuntu2004 box which contains Ubuntu 20.04. (oo-BUN-too).
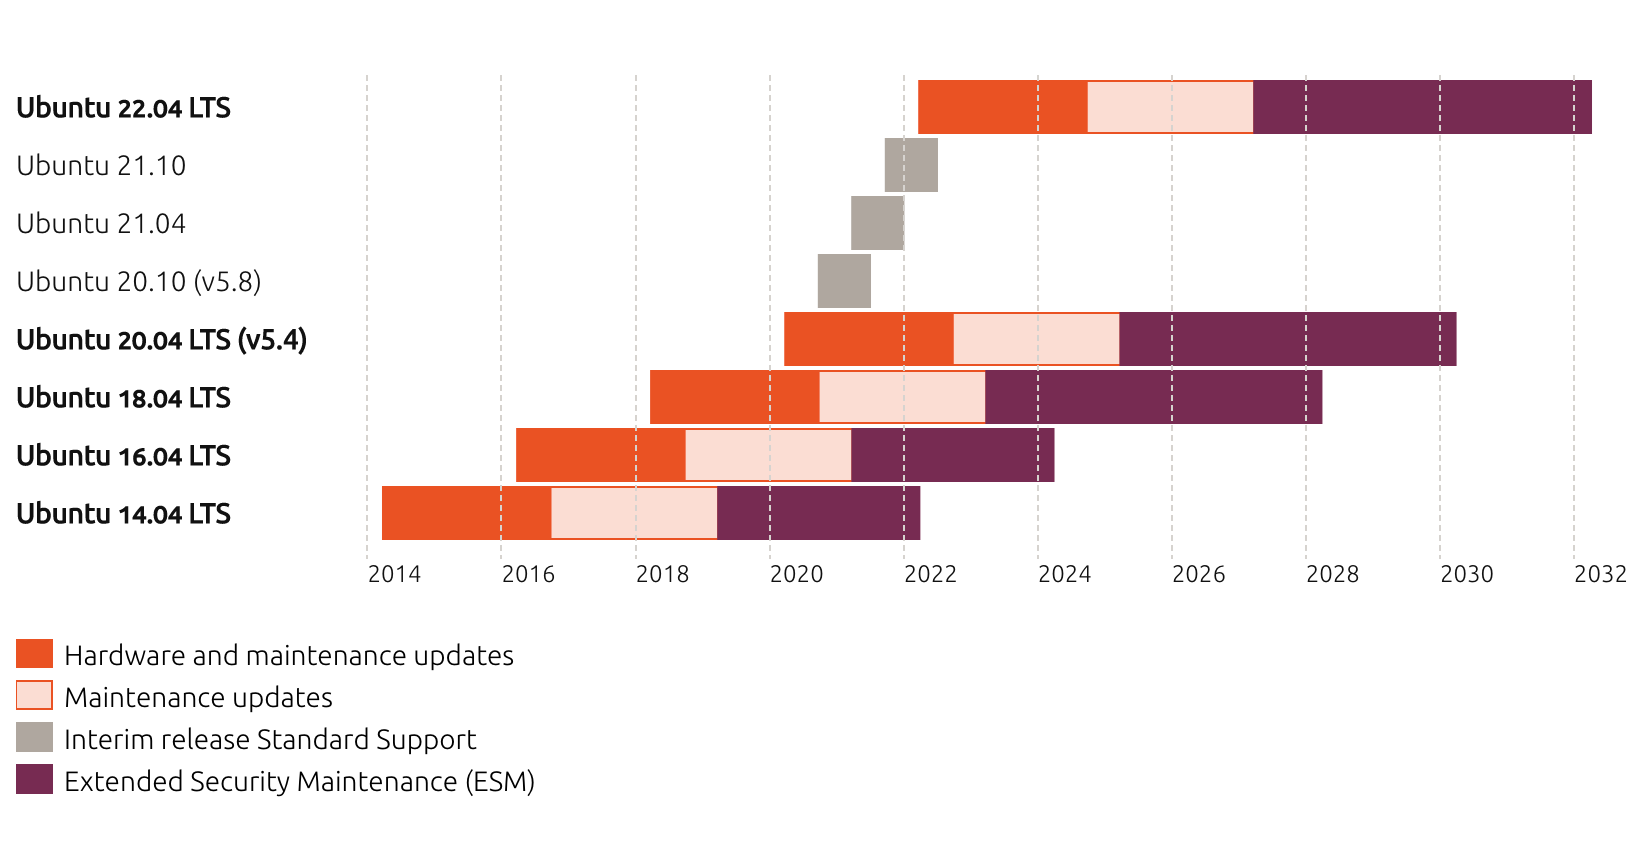
Ubuntu 20.04?
At the time of this writing Ubuntu has recently released 20.10 (in October of 2020) so why are we using 20.04? The reason for this is that while Ubuntu releases a new version every 6 months they only create a Long Term Support (LTS) release once every two years in April. The LTS release gets support for five years while the non-LTS releases are only supported for 9 months. We’re not going to want to redo our infrastructure after 9 months so while the older version may have older versions of some packages it’s not worth the hassle of refreshing all the servers all the time.
Create a New Directory
To start, we’re going to create a new directory to house our project files.
mkdir ~/our-awesome-project
cd ~/our-awesome-project
Vagrant Init
Now we’re going to use the vagrant init command to tell it to initialize a configuration file (Vagrantfile by default) with the box (generic/ubuntu2004) we’re going to use.
our-awesome-project % vagrant init generic/ubuntu2004
A `Vagrantfile` has been placed in this directory. You are now
ready to `vagrant up` your first virtual environment! Please read
the comments in the Vagrantfile as well as documentation on
`vagrantup.com` for more information on using Vagrant.
The Vagrantfile that has been created is full of comments to help us configure our development environment. We’re not going to include those in our listings for this series because it’s hard to follow as we make changes. The listing below, which we’ll refer to as our “base Vagrentfile”, contains the pieces that are required to get us started.
Vagrant.configure("2") do |config|
  config.vm.box = "generic/ubuntu2004"
end
Because it’s “just” a text file we can and should use our version control software to track changes to it.
Vagrant Validate
We’ll be making a lot of changes to our Vagrantfile and after we make any changes we can run vagrant validate to make sure the file is valid so we can run the next set of commands.
our-awesome-project % vagrant validate
Vagrantfile validated successfully.
Vagrant Status
Because Vagrant is a command-line tool it’s a challenge to determine the current status of our development environment. Vagrant provides the “status” command so we can see the status of our environment.
our-awesome-project % vagrant status
Current machine states:

default                   not created (virtualbox)

The environment has not yet been created. Run `vagrant up` to
create the environment. If a machine is not created, only the
default provider will be shown. So if a provider is not listed,
then the machine is not created for that environment.
This is very clearly telling us that we haven’t created the VM associated with this environment so we’ll do that next.
We’ll see “default” again and again as we work through these examples. That indicates the name of the VM that it will create and in a future article we’ll discuss having multiple VMs in a single Vagrantfile.
Global Status
There is also a global-status command that will allow us to view all of the Vagrant managed development environments on the host computer.
This can be helpful to make sure we’ve shut down all of the VMs.
In our next article, we’ll discuss how to use Vagrant to power on and off the VMs that that are part of our development environment.

Scott Keck-Warren
Scott is the Director of Technology at WeCare Connect where he strives to provide solutions for his customers needs. He's the father of two and can be found most weekends working on projects around the house with his loving partner.
Top Posts
- Working With Soft Deletes in Laravel (By Example)
- Fixing CMake was unable to find a build program corresponding to "Unix Makefiles"
- Upgrading to Laravel 8.x
- Get The Count of the Number of Users in an AD Group
- Multiple Vagrant VMs in One Vagrantfile
- Fixing the "this is larger than GitHub's recommended maximum file size of 50.00 MB" error
- Changing the Directory Vagrant Stores the VMs In
- Accepting Android SDK Licenses From The OSX Command Line
- Fixing the 'Target class [config] does not exist' Error
- Using Rectangle to Manage MacOS Windows
More In This Series
- What's a Virtual Machine?
- Why Use Vagrant?
- Initializing a Vagrant Development Environment
- Managing A Vagrant Environment's Power State
- How to Reset/Delete A Vagrant Development Environment
- Configuring Our Vagrant Development Environment's Network
- Remotely Accessing Our Vagrant Development Environment (Linux/Ubuntu)
- Syncing Files to Our Vagrant Development Environment
- Customizing the Amount Of RAM in Our Vagrant VMs
- Displaying Our Vagrant VMs User Interface
- Saving Vagrant States Using Snapshots