Using Rectangle to Manage MacOS Windows

As knowledge workers, we spend a lot of time managing windows on our computers. This can take up a lot of time during our day and can be compounded if we have large or multiple monitors. By using Rectangle we can operate more effectively and in turn generate code faster.
Rectangle is a free and open source application built by Ryan Hanson and distributed on https://rectangleapp.com/. Rectangle allows us to manage our application windows using keyboard shortcuts and mouse hotspots.
Ryan also develops Hookshot which is a utility built on Rectangle with some additional bells and whistles. At the time of this writing, there’s a 10-day free trial and then it’s $7.99 USD for a license. The big difference between the two appears to be the fact that we have better control over window placement using our mouse in Hookshot. This post will discuss Rectangle only but if you want to support Ryan and the future development of Rectangle and Hookshot you can purchase a copy through the website.
This post is an adaptation of Using Rectangle to Manage macOS Windows on our YouTube Channel.
A Note About Spectacle
For years we’ve used Spectacle to manage our application windows. It was usually the second application installed on any new computer. Spectacle is no longer in active development and Rectangle does everything Spectacle did and more so we’re recommending it now. We’re mentioning Spectacle because there are references to it in Rectangle and we wanted to give some background information on it for when we encounter those references.
Installation
Installing Rectangle is a simple process.
1. Download from website
The first step is to download the DMG file from https://rectangleapp.com/ and then open it.
2. Drag application into Application Directory
Once the DMG has been verified and opened it will open a new Finder window so we can drag Rectangle into the Applications directory.
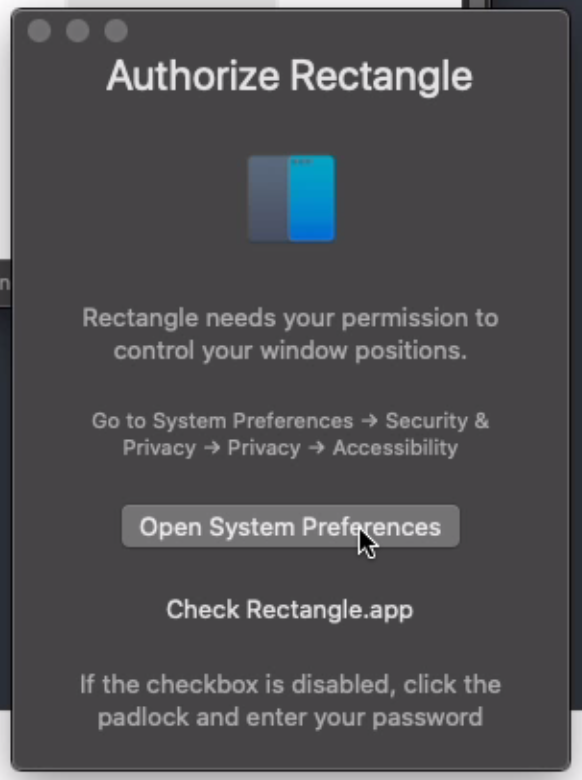
3. Allow access in Preferences
Now that we’ve installed the application we’re going to launch it for the first time.
The first thing we need to do is to allow Rectangle to control our computer in the “Accessibility” section of the “Privacy” tab in the System Preferences. Rectangle will prompt us and bring us to the correct screen. It’s very important to do this because without Rectangle being checked in this preference pane Rectangle will not work.
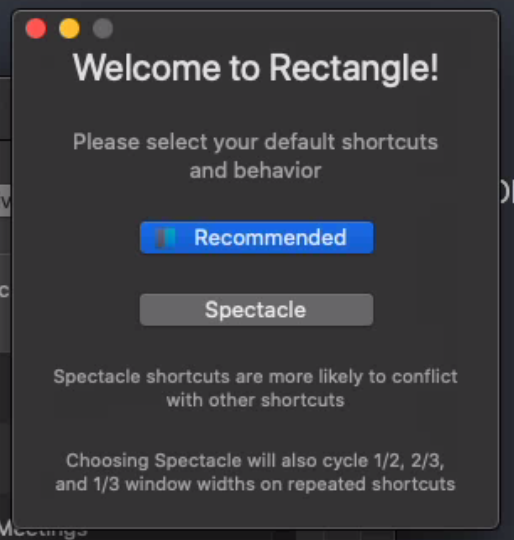
4. Shortcut Questions
After this has been done we’ll get a question about shortcuts. It’s best to pick the Recommended shortcuts as it will give us a more unified experience using Rectangle.
Power is in the shortcuts
As we’ve discussed before it’s important to learn the keyboard shortcuts to any application that we use all the time. The time savings that can be made by not switching between our keyboard and our mouse can make a huge difference in our productivity. Learning the keyboard shortcuts for Rectangle is a huge performance multiplier because it can be applied to all of the applications we use every day. To that end, we’re going to discuss how we can use the mouse features of Rectangle but also what the keyboard shortcuts are to perform the same action.
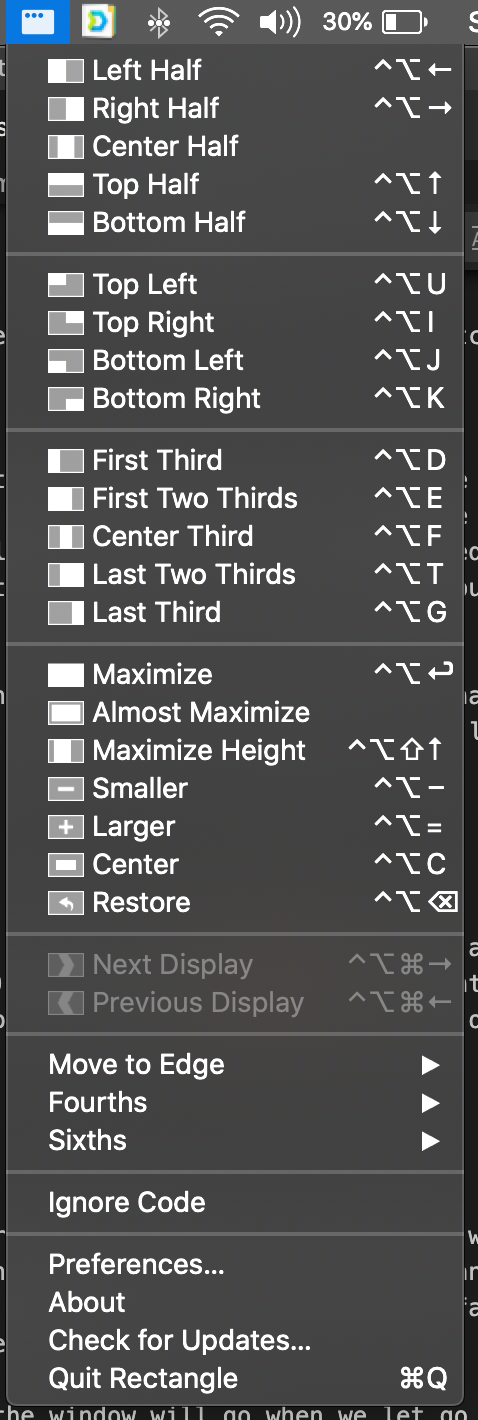
Most of the shortcuts for Rectangle are Control(⌃) + Option(⌥) + something but to get a reference of what the shortcuts are we can click on the Rectangle icon in the menu bar. Looking at this list can be a little overwhelming but we’ll go through them now to help you.
Move a Window to Another Screen
The most useful feature of Rectangle for those of us who have multiple monitors is the ability to move a window to a different monitor by using keyboard shortcuts. The keyboard shortcuts Control(⌃) + Option(⌥) + Command(⌘) + right arrow and Control(⌃) + Option(⌥) + Command(⌘) + left arrow move a window to the next or previous monitors (the order is based on their arrangement in System Preferences).

Snapping Windows
Rectangle supports dragging our cursor to a specific hotspot on our screen and having it then snap the window into a portion of the display. We’ll go over some of the more common options for how we might want to organize our windows and provide both the keyboard shortcuts and the position of the cursor to get the windows into those spots. The snap positions are fairly logical so it shouldn’t take too much effort to figure them out when needed even if we don’t memorize them.
The nice thing about the snapping feature is that it highlights where the window will go when we let go of it so we won’t be surprised.

Maximize a Window
A lot of the time as we’re using an application we want it to take up as much of the screen as possible so we can maximize the viewable information. To use Rectangle to maximize our window we can drag it to the center top of our screen.
We can also use the keyboard shortcut Control(⌃) + Option(⌥) + Enter. This is one of the keyboard shortcuts we find ourselves a lot so it’s worth learning.
Half Screen Windows
Creating two half-width or half-height windows can be beneficial when we want to compare data in two different applications or we want to reference something in one window while typing in another. Rectangle allows us to easily put one window on each half of the display both vertically and horizontally.
To move our window to the left or right half of the screen we can move it to the left or right center of our monitor.
To move our window to the top or bottom half of the screen we can move it to the top or bottom of the left or right sides of our monitor.
The keyboard shortcuts for these actions are Control(⌃) + Option(⌥) + a directional arrow. The arrow will determine which half of the screen to position the window.
If there are multiple monitors attached to the computer repeatedly pressing the arrow keys will cause the window to switch screens as well as which half of the screen it’s positioned on.
Third Screen Windows
Rectangle supports splitting our window into thirds across our screen. This can be done by dragging the window to the bottom of the screen so it snaps into a position.
Rectangle breaks the screen into a first, center, and last third moving left to right.
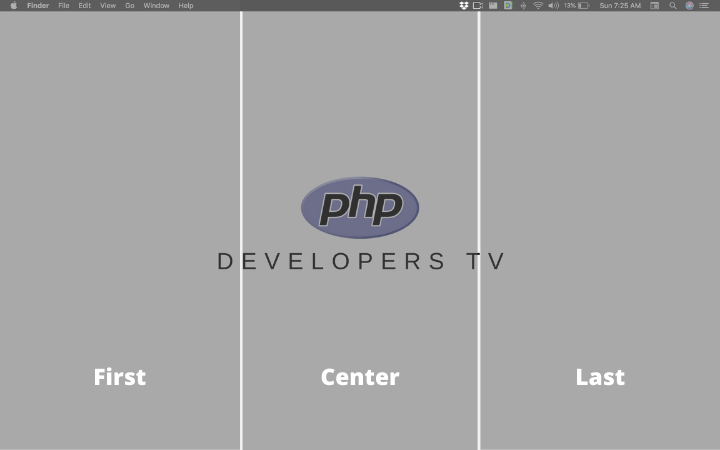
The keyboard shortcuts for this are Control(⌃) + Option(⌥) + d, Control(⌃) + Option(⌥) + f, and Control(⌃) + Option(⌥) + g to move the window into the first, center, and last thirds respectively.
Rectangle also allows us to position a window into the first two thirds and the last two thirds.
This can be done by dragging our window into the first third or last third of the screen and then dragging the window in the center third.

The keyboard shortcuts for this are Control(⌃) + Option(⌥) + e and Control(⌃) + Option(⌥) + t.
Quadrants
The final window positioning feature with hotspot support we’re going to discuss is moving our windows in the four quadrants of the screen. This can be done by moving the window to the corner of the screen we want it to be positioned in.
The keyboard shortcuts for this feature are Control(⌃) + Option(⌥) + u, Control(⌃) + Option(⌥) + i, Control(⌃) + Option(⌥) + j, and Control(⌃) + Option(⌥) + k for upper left, upper right, lower right, and lower left respectively. u, i, j, and k form a little square on our keyboard if that’s helpful.
Other features
There are some other features that Rectangle has that can be used to manage the size of our screens that we would feel negligent not mentioning even if they don’t fit into a normal workday. These features don’t have a snap location but they do have keyboard shortcuts so we’ll go over them quickly.
Restore a Window
If we accidentally manipulate a window with Rectangle we can use the keyboard shortcut Control(⌃) + Option(⌥) + Delete to restore the window to its previous state.
Center a Window
To center a window on the display we can use Control(⌃) + Option(⌥) + C.
Smaller/Large
A window can be made smaller or larger using the keyboard shortcuts Control(⌃) + Option(⌥) + - or Control(⌃) + Option(⌥) + + respectively.
Have Fun
Rectangle can be a huge boost to our performance with or without the keyboard shortcuts. Thankfully the keyboard shortcuts are easy to learn if we remember most of them start out with Control(⌃) + Option(⌥).
Did we miss something? Let us know in the comments.

Scott Keck-Warren
Scott is the Director of Technology at WeCare Connect where he strives to provide solutions for his customers needs. He's the father of two and can be found most weekends working on projects around the house with his loving partner.
Top Posts
- Working With Soft Deletes in Laravel (By Example)
- Fixing CMake was unable to find a build program corresponding to "Unix Makefiles"
- Upgrading to Laravel 8.x
- Get The Count of the Number of Users in an AD Group
- Multiple Vagrant VMs in One Vagrantfile
- Fixing the "this is larger than GitHub's recommended maximum file size of 50.00 MB" error
- Changing the Directory Vagrant Stores the VMs In
- Accepting Android SDK Licenses From The OSX Command Line
- Fixing the 'Target class [config] does not exist' Error
- Using Rectangle to Manage MacOS Windows