Maximizing Your Efficiency in Sublime Text - Snippets
As we talked about last time, Sublime Text will autocomplete specific keywords that are defined by either the Sublime Text crew or a plugins developers. What if I told you that it’s possible to create snippets to create your own keywords to speed up your development.
As an example, in my Symfony projects I have a tendency to create a lot of links and they usually look like this:
<a href="{{ path('route_name', {'id': item.id})}}">Do Something</a>Now I can (and have) copy and pasted that over and over again but I can create a snippet so I can type a short keyword, hit tab, and the code will automatically fill in.
Let’s try it.
Creating the Snippet
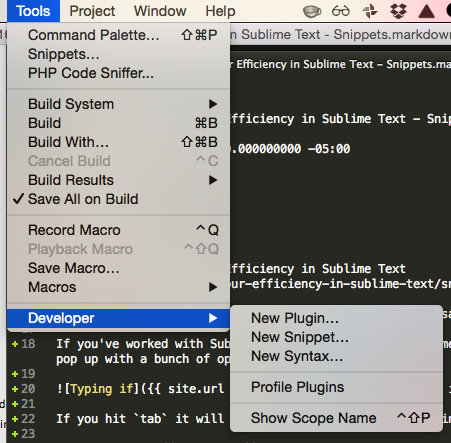
To create a new Snippet go to the “Tools” menu then “Developer” and finally “New Snippet…”
This will open a new snippet file. Like settings these are just text files so you can easily back them up and move them around. The snippet files are saved in “~/Library/Application Support/Sublime Text 3/Packages/User” on OSX and “%USERPROFILE%\AppData\Roaming\Sublime Text 3\Packages\User” on Windows.
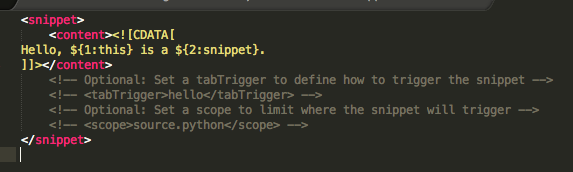
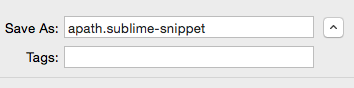
The first thing we’re going to do is to save this. When you save the file it’s VERY important your file extension is “sublime-snippet” or it will not work. We’re going to name this “apath.sublime-snippet” (for reasons that will become apparent shortly).
To start we’re just going to past in the full text from above into the content node. We’re also going to uncomment the tabTrigger node and set it’s value to “apath” (a shortened version of “a element with path” but use whatever you can remember)
<snippet>
    <content><![CDATA[
<a href="{{ path('route_name', {'id': item.id})}}">Do Something</a>
]]></content>
    <!-- Optional: Set a tabTrigger to define how to trigger the snippet -->
    <tabTrigger>apath</tabTrigger>
    <!-- Optional: Set a scope to limit where the snippet will trigger -->
    <!-- <scope>source.python</scope> -->
</snippet>
Now you can enter a file type “apath” hit tab and see our content:

Filtering To A Specific File Type
A slight downside to the way this snippet is setup is that it will works in every file extension. I’m working in a Markdown file right now and if I type “apath” and hit “tab” it auto fills:

To fix we this we need to fill in the scope node. To determine what value we’re going to put in the node we need to go into a .html.twig file (or whatever you’re working on) go into the “Tools” menu then “Developer” and then “Show Scope Name” and this box will show up:

You can click the “copy” link and then paste it into the sublime-snippet file:
<snippet>
    <content><![CDATA[
<a href="{{ path('route_name', {'id': item.id})}}">Do Something</a>
]]></content>
    <!-- Optional: Set a tabTrigger to define how to trigger the snippet -->
    <tabTrigger>apath</tabTrigger>
    <!-- Optional: Set a scope to limit where the snippet will trigger -->
    <scope>text.html.twig</scope>
</snippet>
Now apath doesn’t do anything special outside of twig files.
Fields
So the nice thing about this is that we now have a reusable anchor tag with Symfony’s path included but we could make it a little easier to flagging the sections we usually enter data as fields. This is a simple process of replacing the sections we’re going to replace with a dollar sign and then a number:
<snippet>
    <content><![CDATA[
<a href="{{ path('$1', {'id': item.id})}}">$2</a>
]]></content>
    <!-- Optional: Set a tabTrigger to define how to trigger the snippet -->
    <tabTrigger>apath</tabTrigger>
    <!-- Optional: Set a scope to limit where the snippet will trigger -->
    <scope>text.html.twig</scope>
</snippet>
The thing I love about this is that you can tab between the different fields so it’s easy to fill in the needed values. After you’ve tabbed though all the fields it will move the cursor to the end of the line so you can keep typing.

In this case it’s fairly evident what we want to insert but you can also add placeholder text to explain it.
<snippet>
    <content><![CDATA[
<a href="{{ path('${1:route}', {'id': item.id})}}">${2:Link Title}</a>
]]></content>
    <!-- Optional: Set a tabTrigger to define how to trigger the snippet -->
    <tabTrigger>apath</tabTrigger>
    <!-- Optional: Set a scope to limit where the snippet will trigger -->
    <scope>text.html.twig</scope>
</snippet>
$SELECTION Field
There are a couple fields that have special significants inside the snippet. If you’re interested there’s a list available online. For the most part I’ve never needed to use most of them but the $SELECTION field can be helpful but a little difficult to use. The $SELECTION field takes what’s selected and places it into the $SELECTION location. To get this to work type the tabTrigger then select the text plus the tab trigger and then press tab with the cursor at the end of the tabTrigger.
<snippet>
    <content><![CDATA[
<a href="{{ path('${1:route}', {'id': item.id})}}">$SELECTION</a>
]]></content>
    <!-- Optional: Set a tabTrigger to define how to trigger the snippet -->
    <tabTrigger>apath</tabTrigger>
    <!-- Optional: Set a scope to limit where the snippet will trigger -->
    <scope>text.html.twig</scope>
</snippet>
Mirrored Fields
I want to mention mirror fields because they’re also helpful. You can reuse the numbers inside the snippet at which point they become mirrored fields and when you’re initially setting them up they’ll have the same text entered:
<snippet>
    <content><![CDATA[
<a href="{{ path('${1:route}', {'id': item.id})}}">${1:Link Title}</a>
]]></content>
    <!-- Optional: Set a tabTrigger to define how to trigger the snippet -->
    <tabTrigger>apath</tabTrigger>
    <!-- Optional: Set a scope to limit where the snippet will trigger -->
    <scope>text.html.twig</scope>
</snippet>

Scott Keck-Warren
Scott is the Director of Technology at WeCare Connect where he strives to provide solutions for his customers needs. He's the father of two and can be found most weekends working on projects around the house with his loving partner.
Top Posts
- Working With Soft Deletes in Laravel (By Example)
- Fixing CMake was unable to find a build program corresponding to "Unix Makefiles"
- Upgrading to Laravel 8.x
- Get The Count of the Number of Users in an AD Group
- Multiple Vagrant VMs in One Vagrantfile
- Fixing the "this is larger than GitHub's recommended maximum file size of 50.00 MB" error
- Changing the Directory Vagrant Stores the VMs In
- Accepting Android SDK Licenses From The OSX Command Line
- Fixing the 'Target class [config] does not exist' Error
- Using Rectangle to Manage MacOS Windows