Configuring Our Vagrant Development Environment's Network

Vagrant allows us several networking options for our development environments. In this article we’ll discuss making changes to our Vagrantfile to configure the networking.
Public Network
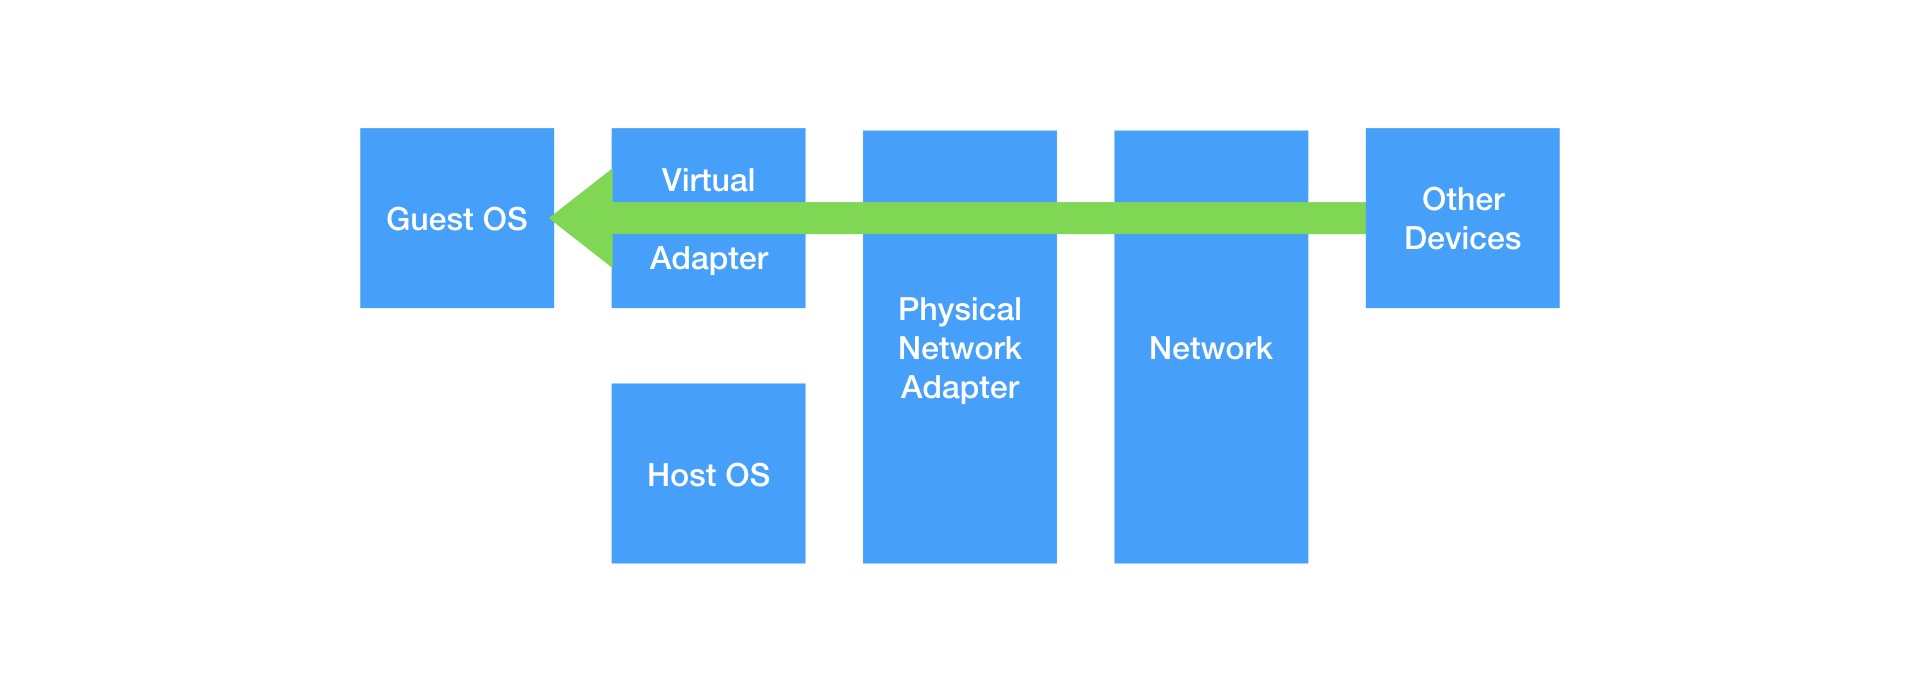
The first option we’re going to discuss is the “public_network” setting. In this mode, the provider will connect our VM as if it were a physical device to our host computer’s network. This will allow other computers on the same network as our computer to access our VM.
Vagrant doesn’t recommend this mode as:
Vagrant boxes are insecure by default and by design, featuring public passwords, insecure keypairs for SSH access, and potentially allow root access over SSH. With these known credentials, your box is easily accessible by anyone on your network. Before configuring Vagrant to use a public network, consider all potential security implications and review the default box configuration to identify potential security risks.
– from https://www.vagrantup.com/docs/networking/public_network
We also don’t recommend this mode but we want to cover it for cases where we need to put the whole VM on the network.
To enable this feature we need to add config.vm.network "public_network" to our base Vagrantfile. If you missed our discussion on creating our base Vagrantfile check out https://www.thisprogrammingthing.com/2021/Initializing-a-Vagrant-Development-Environment/.
This new configuration line will make our Vagrantfile look like the following.
Vagrant.configure("2") do |config|
  config.vm.box = "generic/ubuntu2004"
  config.vm.network "public_network"
end
Next, we’ll do a quick vagrant validate to make sure it’s a valid change.
our-awesome-project % vagrant validate
Vagrantfile validated successfully.
The next time we vagrant up or vagrant reload our environment we’ll be presented with the following prompt asking us which network interface we want to use for the VM.
our-awesome-project % vagrant reload;
==> default: Attempting graceful shutdown of VM...
==> default: Checking if box 'generic/ubuntu2004' version '3.1.20' is up to date...
==> default: Clearing any previously set forwarded ports...
==> default: Clearing any previously set network interfaces...
==> default: Available bridged network interfaces:
1) en0: Wi-Fi (Wireless)
2) en3: USB Ethernet(?)
3) en1: Thunderbolt 1
4) en2: Thunderbolt 2
5) bridge0
6) p2p0
7) awdl0
8) llw0
==> default: When choosing an interface, it is usually the one that is
==> default: being used to connect to the internet.
==> default:
    default: Which interface should the network bridge to?
In this case, the host is connected to our internal network through the Wi-Fi so we’ll enter a “1” and then hit return. After this, the VM will continue to boot as normal.
If we vagrant ssh into our VM we can run ip a to see that our VM now has an IP address of 192.168.4.50 which is on our internal network. In our examples, anything starting with 192.168.4 is part of our internal network.
our-awesome-project % vagrant ssh

vagrant@vagrant:~$ ip a
~~~ snip ~~~
3: eth1: <BROADCAST,MULTICAST,UP,LOWER_UP> mtu 1500 qdisc fq_codel state UP group default qlen 1000
    link/ether 08:00:27:c9:7f:10 brd ff:ff:ff:ff:ff:ff
    inet 192.168.4.50/22 brd 192.168.7.255 scope global dynamic eth1
       valid_lft 14381sec preferred_lft 14381sec
    inet6 fe80::a00:27ff:fec9:7f10/64 scope link
       valid_lft forever preferred_lft forever
Private Network
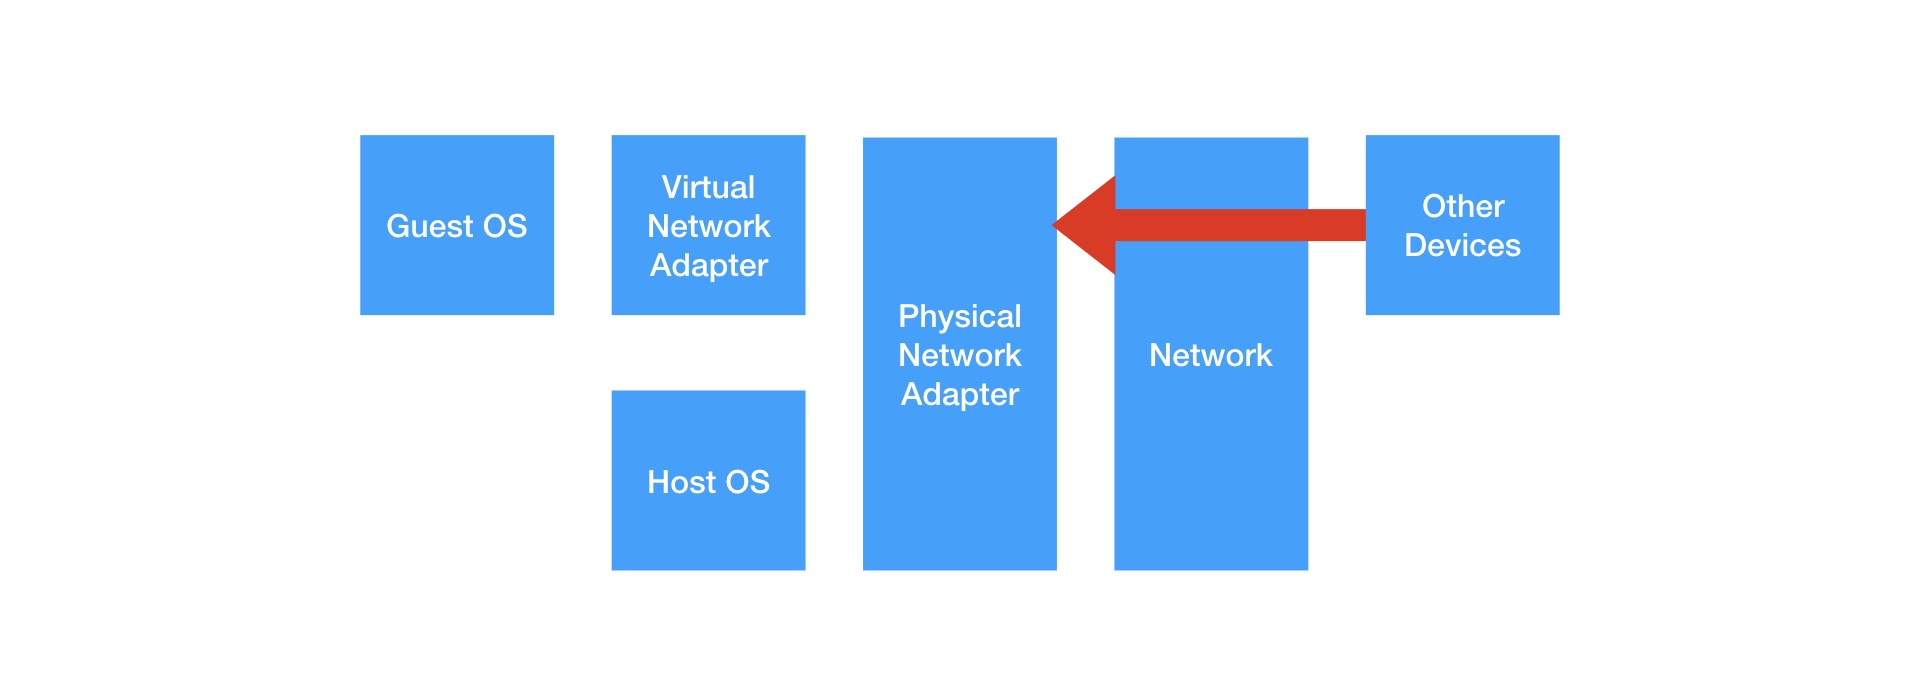
The other networking option is a private network. In a private network, the VM is connected to a virtual adapter that the provider creates that only allows traffic on the host computer and between VMs. To reiterate, this is our preferred method for setting up a network as it provides an extra level of security.
To enable this feature we need to add config.vm.network "private_network" to our Vagrantfile. We’re also going to specify the IP address used by the VM. The downside to this is that we have to manage what VMs have what IP if we’re working with multiple VMs. The upsides are that it makes it easier to know what the IP address is without vagrant sshing in and the IP doesn’t get randomly reset forcing us to update a bunch of configuration files. We’ve worked on projects where the IP address wasn’t specified so trust us when we say it’s less of a headache managing the IP address than having to handle IP reassignments.
With this new configuration setting our Vagrantfile will look like the following.
Vagrant.configure("2") do |config|
  config.vm.box = "generic/ubuntu2004"
  config.vm.network "private_network", ip: "192.168.33.10"
end
Now if we vagrant ssh into our VM we can see that the VM is using the IP address we statically assigned.
vagrant@vagrant:~$ ip a
~~~ snip ~~~
3: eth1: <BROADCAST,MULTICAST,UP,LOWER_UP> mtu 1500 qdisc fq_codel state UP group default qlen 1000
    link/ether 08:00:27:ff:5f:71 brd ff:ff:ff:ff:ff:ff
    inet 192.168.33.10/24 brd 192.168.33.255 scope global eth1
       valid_lft forever preferred_lft forever
    inet6 fe80::a00:27ff:feff:5f71/64 scope link
       valid_lft forever preferred_lft forever
Port Mapping
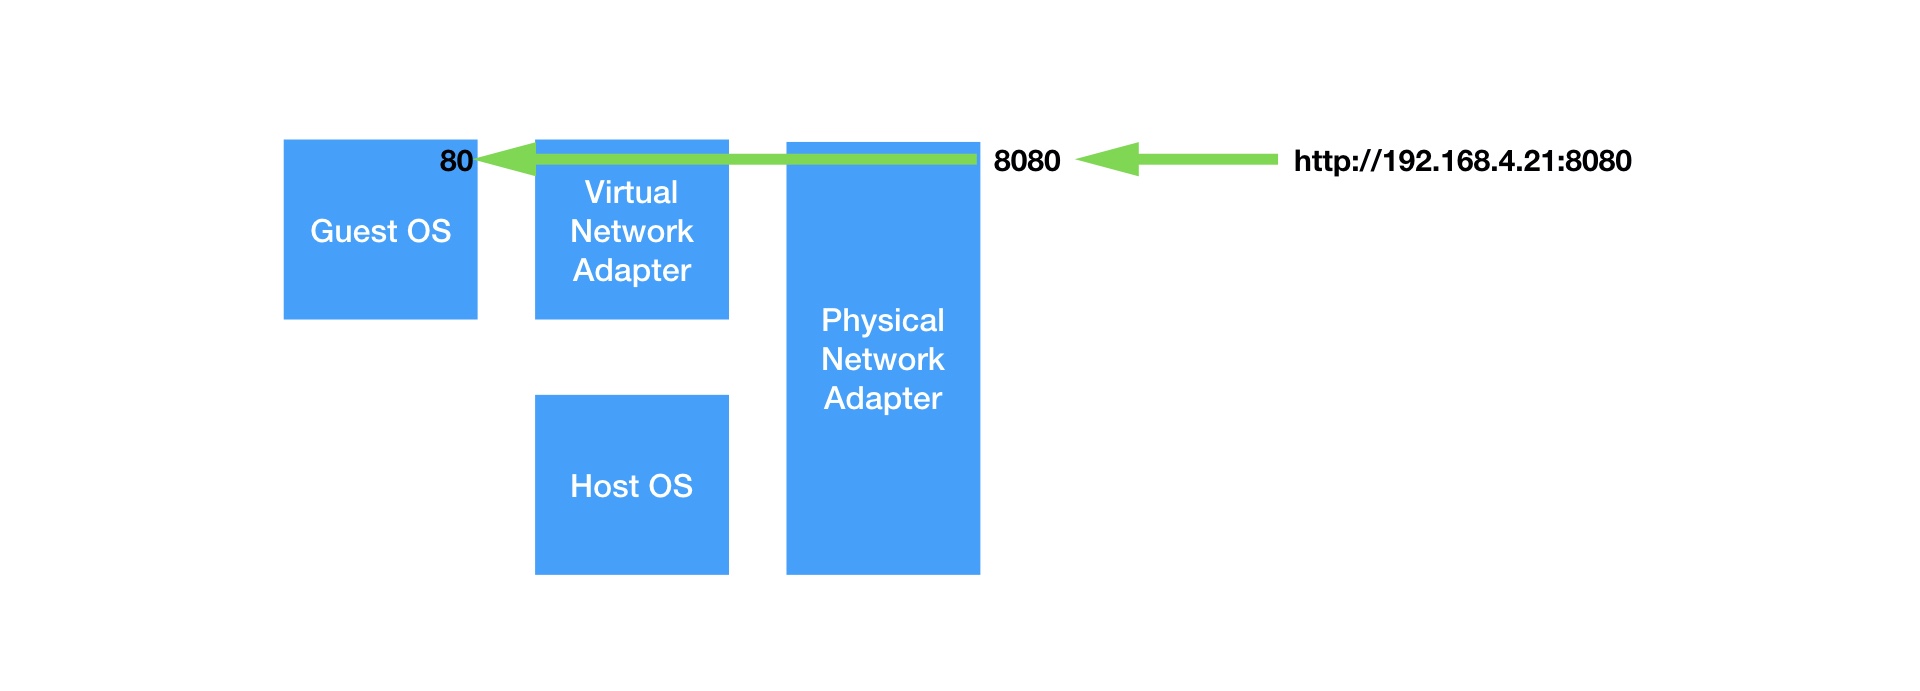
The tradeoff to using a private network is that other devices on the network are unable to access the VM. What if we want to test our application on a phone or tablet? With our current setup, we’re out of luck but thankfully there is a solution. Vagrant allows us to set up a mapping from a port on the host machine to our guest machine using a “forwarded_port” entry in a “config.vm.network” configuration.
For example, if we wanted to forward port 8080 on the host to port 80 in the guest we could add the line config.vm.network "forwarded_port", guest: 80, host: 8080.
After we do this our Vagrantfile will look like the following.
Vagrant.configure("2") do |config|
  config.vm.box = "generic/ubuntu2004"

  config.vm.network "private_network", ip: "192.168.33.10"
  config.vm.network "forwarded_port", guest: 80, host: 8080
end
When we reload the development environment we’ll see the ports that are being forwarded show up in the output. The forward of 2222 to 22 is setup automatically by Vagrant so we can SSH into our VM.
our-awesome-project % vagrant reload
~~~ snip ~~~
==> default: Forwarding ports...
    default: 80 (guest) => 8080 (host) (adapter 1)
    default: 22 (guest) => 2222 (host) (adapter 1)
~~~ snip ~~~
Now we can use the host machine’s IP address with a port of 8080 to access the service using port 80 in the guest.
For example, our host machine’s IP address is 192.168.4.21 so on our test phone we can access http://192.168.4.21:8080.
Vagrant Port
If we ever need a reminder of what ports have been forwarded we can run the vagrant port command to see the list.
our-awesome-project % vagrant port
The forwarded ports for the machine are listed below. Please note that
these values may differ from values configured in the Vagrantfile if the
the provider supports automatic port collision detection and resolution.

    22 (guest) => 2222 (host)
    80 (guest) => 8080 (host)

Scott Keck-Warren
Scott is the Director of Technology at WeCare Connect where he strives to provide solutions for his customers needs. He's the father of two and can be found most weekends working on projects around the house with his loving partner.
Top Posts
- Working With Soft Deletes in Laravel (By Example)
- Fixing CMake was unable to find a build program corresponding to "Unix Makefiles"
- Upgrading to Laravel 8.x
- Get The Count of the Number of Users in an AD Group
- Multiple Vagrant VMs in One Vagrantfile
- Fixing the "this is larger than GitHub's recommended maximum file size of 50.00 MB" error
- Changing the Directory Vagrant Stores the VMs In
- Accepting Android SDK Licenses From The OSX Command Line
- Fixing the 'Target class [config] does not exist' Error
- Using Rectangle to Manage MacOS Windows
More In This Series
- What's a Virtual Machine?
- Why Use Vagrant?
- Initializing a Vagrant Development Environment
- Managing A Vagrant Environment's Power State
- How to Reset/Delete A Vagrant Development Environment
- Configuring Our Vagrant Development Environment's Network
- Remotely Accessing Our Vagrant Development Environment (Linux/Ubuntu)
- Syncing Files to Our Vagrant Development Environment
- Customizing the Amount Of RAM in Our Vagrant VMs
- Displaying Our Vagrant VMs User Interface
- Saving Vagrant States Using Snapshots