Saving Vagrant States Using Snapshots

Vagrant makes it easy to go from zero to working in a very short time. We can feel free to completely wreck our setup because we can reset it back to a working state. The flip side to this is that while it’s easy to reset our VMs it might be a challenge or time-consuming to recreate our data inside the VMs.
What if there was an easy way to take a snapshot of our current VMs drive state so we could quickly get back to it?
In this article we’ll talk about how to use Vagrant’s snapshot feature to do just this.
What is a Snapshot?
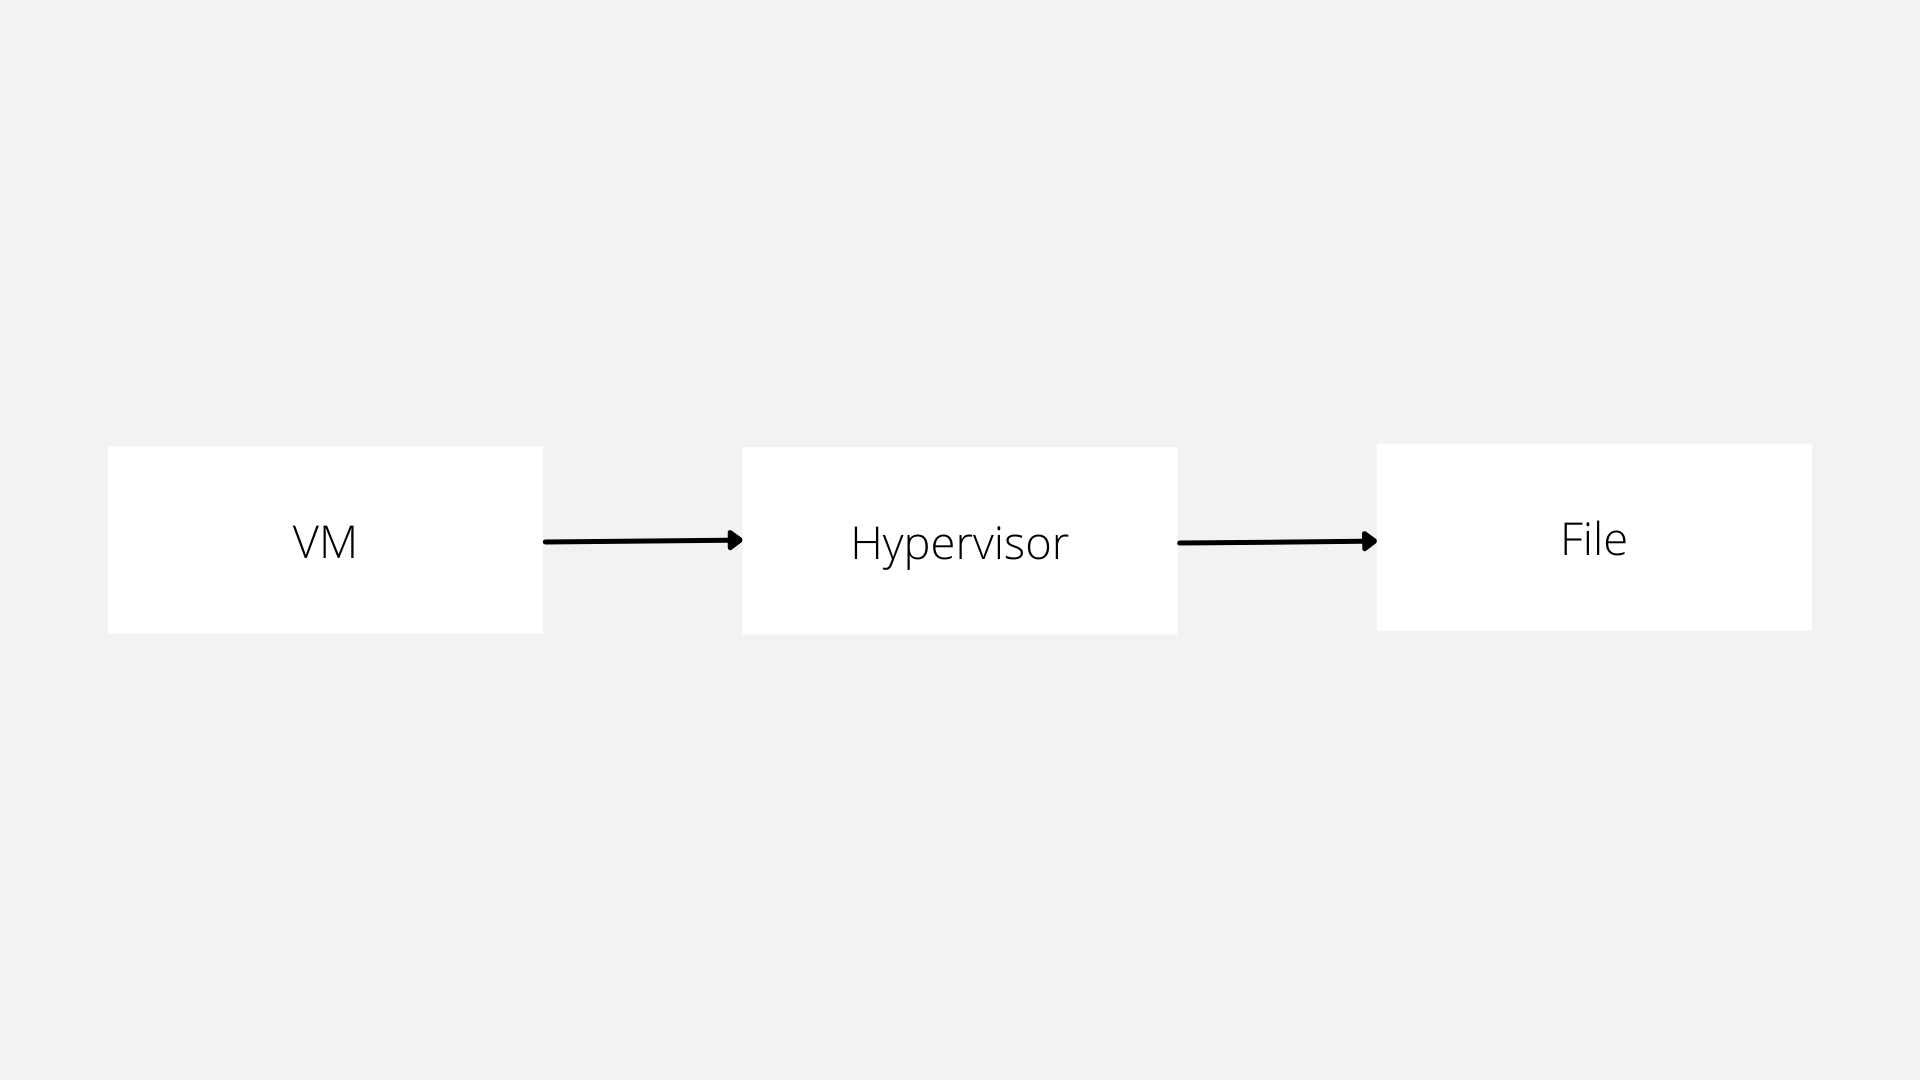
Normally, when a VM writes data to its virtual drive the hypervisor saves the data to a virtual drive file for that VM.
Several hypervisors allow us to define a “snapshot” that freezes the data on the drive at a specific time.
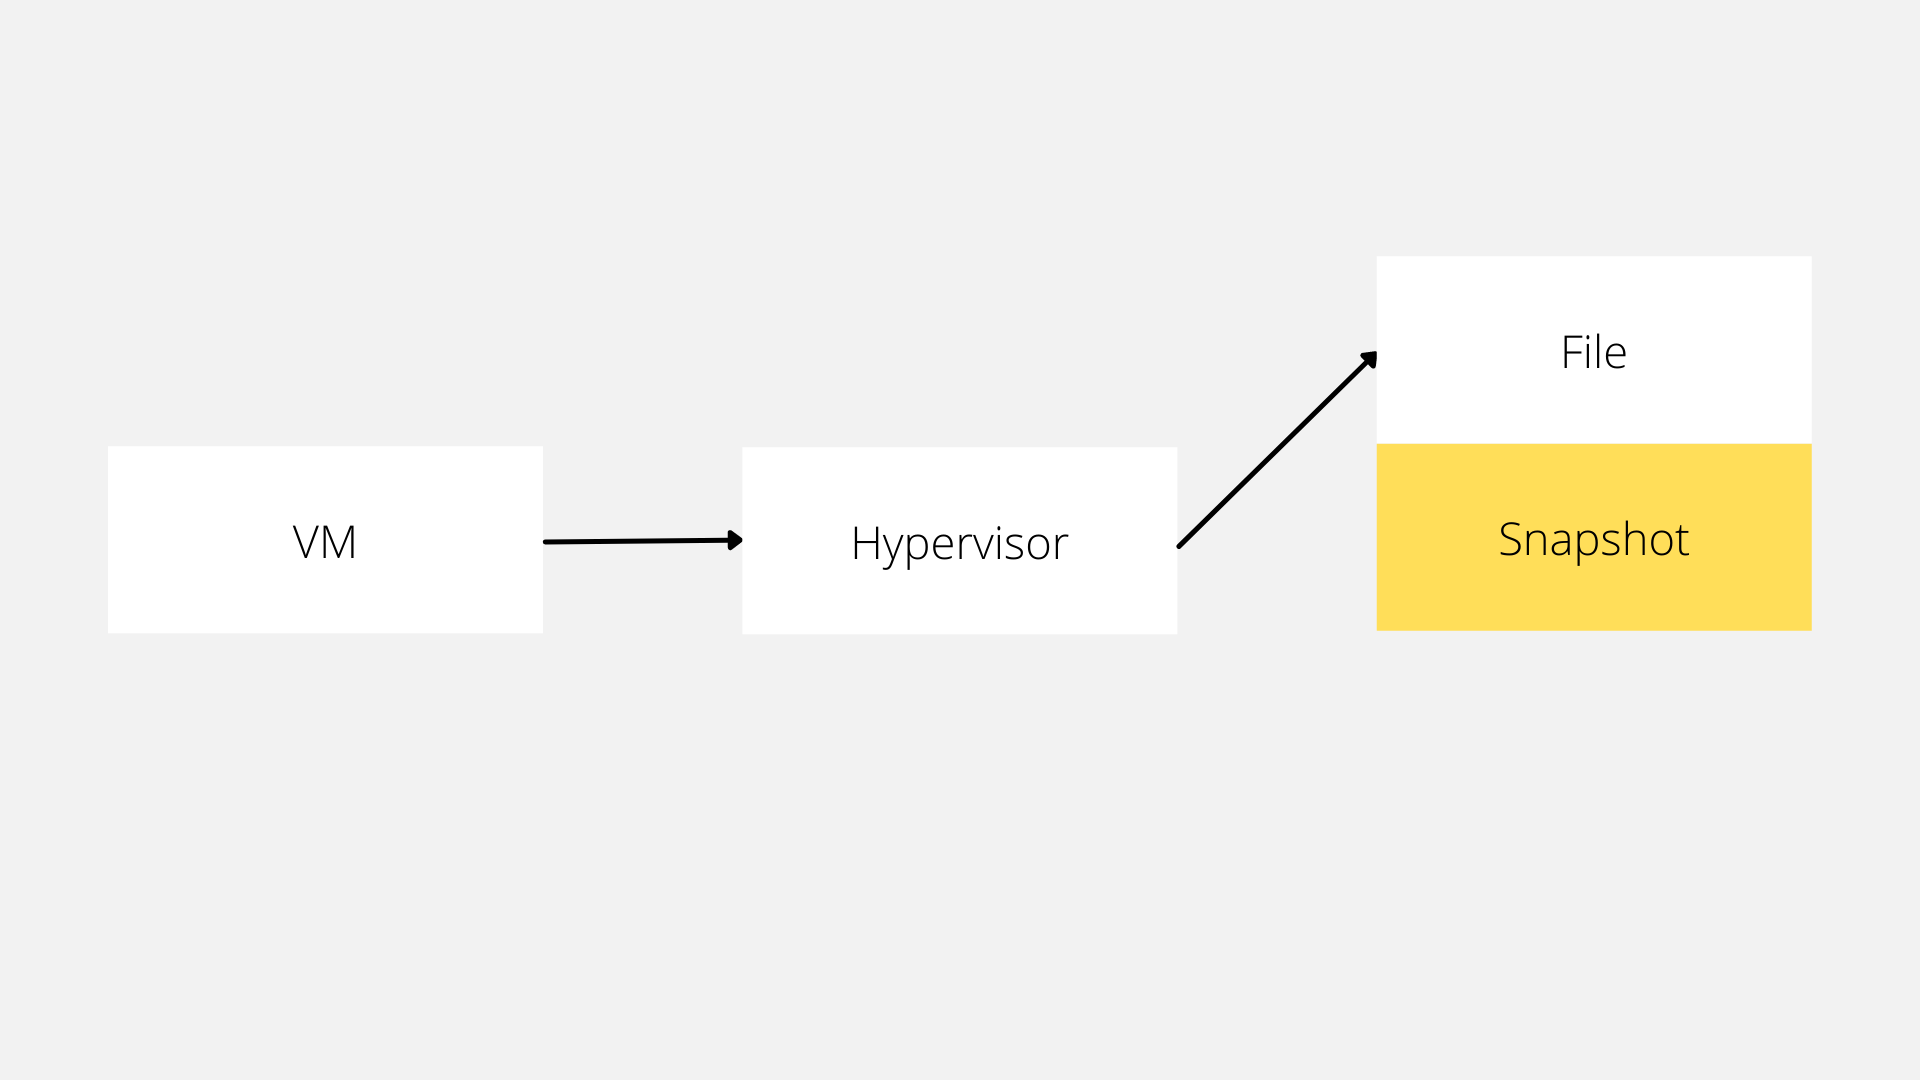
After the snapshot has been created instead of writing to the main virtual drive file the hypervisor writes data to a separate file.
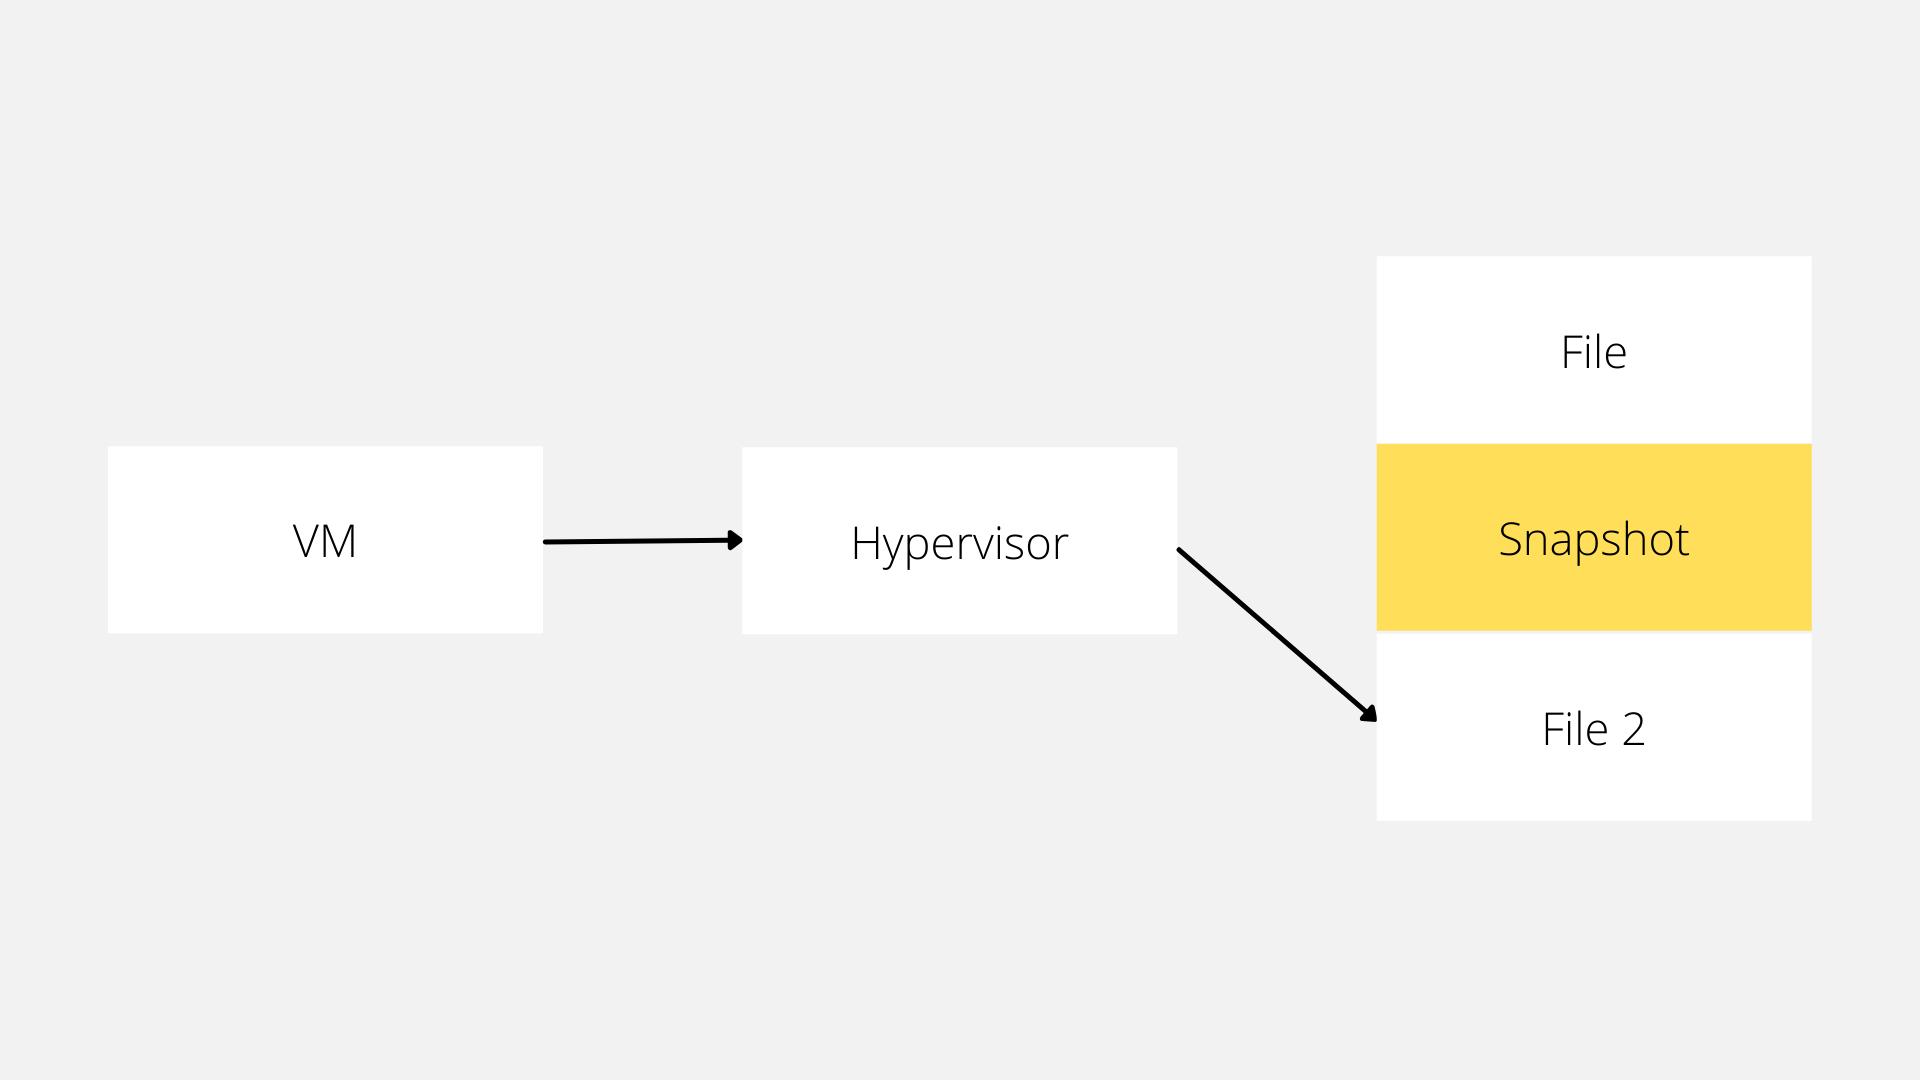
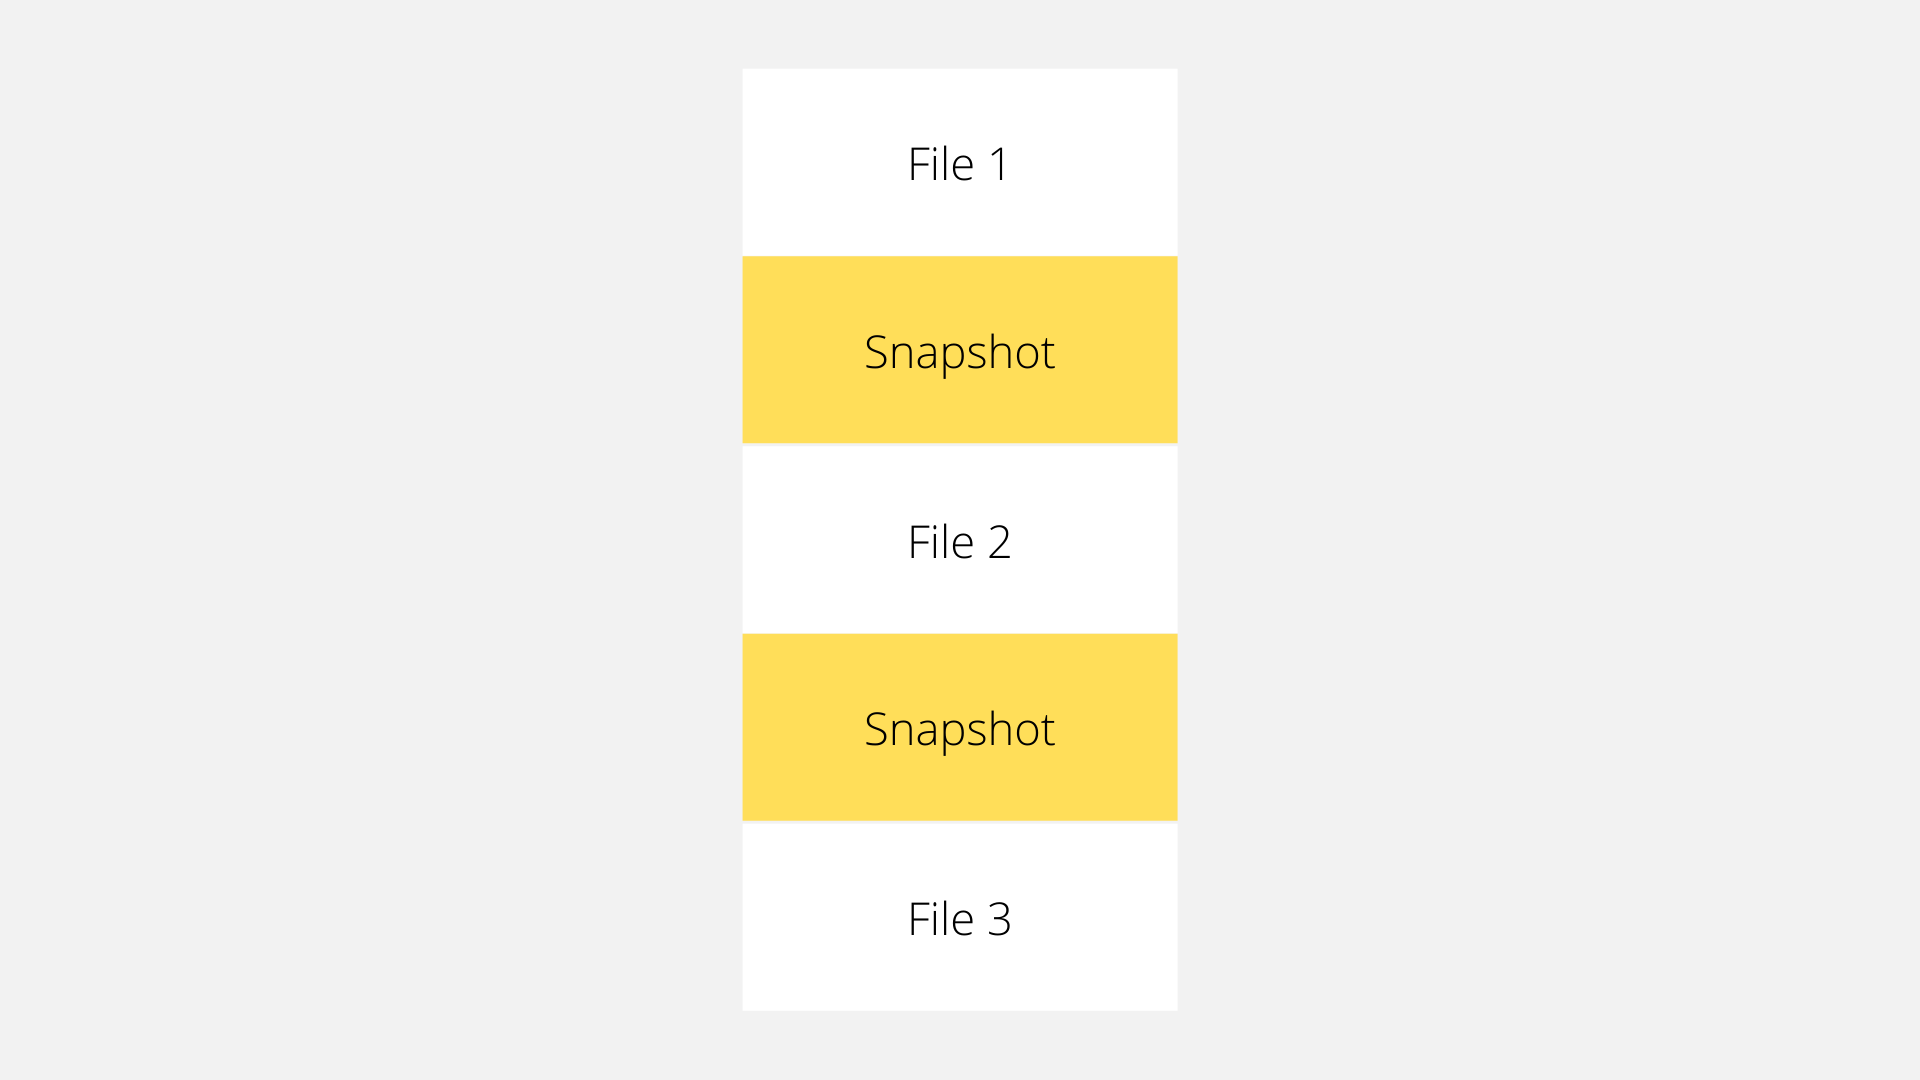
We can create multiple snapshots which can either stack on top of each other or exist in parallel with each other.
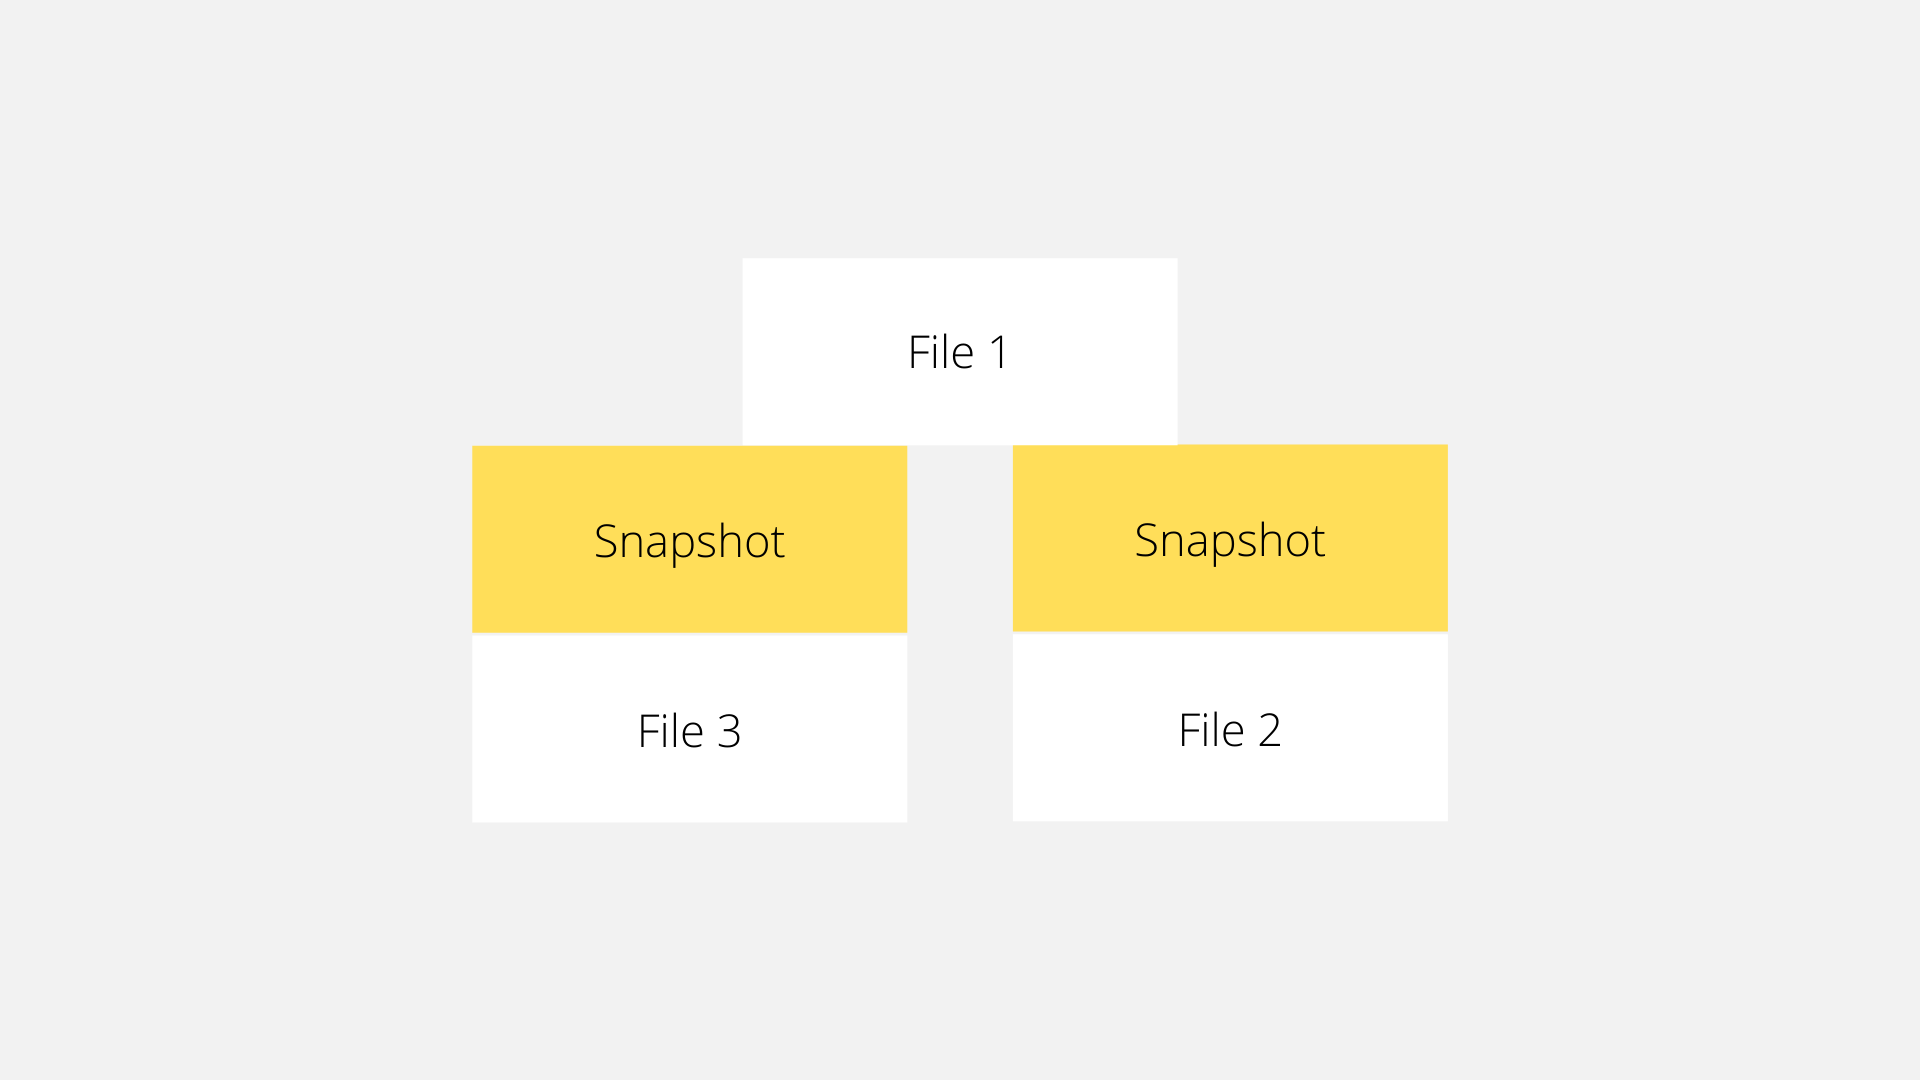
The superpower of snapshots is that because we’re just recording the differences between when we took the snapshot and now it doesn’t take up the same amount of space as a duplicate copy of the VMs drive. We can also quickly discard our changes and get back to when we created our snapshot.
There is a performance penalty to having multiple snapshots. Because each virtual disk has a listing of changes when our VM performs a read operation each virtual disk file has to be consulted to be able to find which one contains the correct data. It’s easy to create a performance bootle neck so we recommend trying to keep the number of snapshots down to at most 2 and never in a production environment for more than an hour or so.
Vagrant allows us to take advantage of this feature (if it’s supported by our hypervisor) using the snapshot command.
vagrant snapshot --help

Usage: vagrant snapshot <subcommand> [<args>]

Available subcommands:
     delete
     list
     pop
     push
     restore
     save

For help on any individual subcommand run `vagrant snapshot <subcommand> -h`
        --[no-]color                 Enable or disable color output
        --machine-readable           Enable machine readable output
    -v, --version                    Display Vagrant version
        --debug                      Enable debug output
        --timestamp                  Enable timestamps on log output
        --debug-timestamp            Enable debug output with timestamps
        --no-tty                     Enable non-interactive output
We could do these same actions in the GUI of our hypervisor but Vagrant makes it a little nicer to work with.
Creating a Snapshot
The first thing we need to discuss is how to create a snapshot. This is done by using the vagrant snapshot save command followed by the name we want for our snapshot. For example, we can create a snapshot after vagrant uping our environment so we can quickly get back to that state of having everything fresh but not wait for all the steps required to initialize the VMs.
vagrant snapshot save initial-setup
==> default: Snapshotting the machine as 'initial-setup'...
==> default: Snapshot saved! You can restore the snapshot at any time by
==> default: using `vagrant snapshot restore`. You can delete it using
==> default: `vagrant snapshot delete`.
To see all the snapshots we’ve created we can run the vagrant snapshot list command.
vagrant snapshot list
==> default:
initial-setup
As we “save” new snapshots they’re based on the snapshot we’re currently working off. If we generated a bunch of testing data we can create a new snapshot.
vagrant snapshot save after-creating-development-data
==> default: Snapshotting the machine as 'after-creating-development-data'...
==> default: Snapshot saved! You can restore the snapshot at any time by
==> default: using `vagrant snapshot restore`. You can delete it using
==> default: `vagrant snapshot delete`.
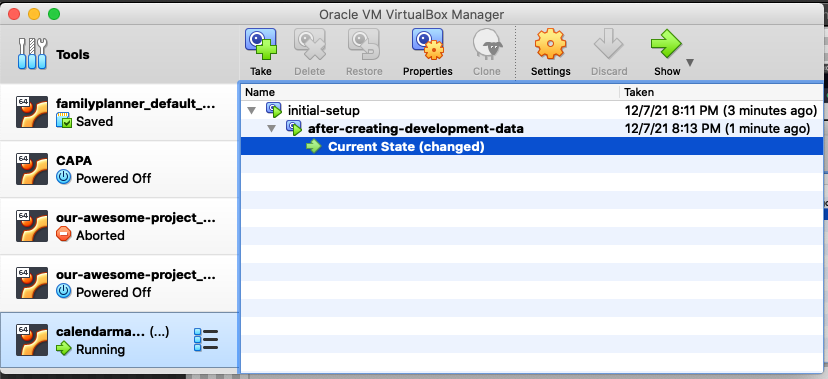
This snapshot has a parent of “initial-setup” which we can see in the VirtualBox GUI. At this point, VirtualBox is keeping track of the difference between our base box, the changes to “initial-setup”, and any changes we’ve made after we created our “after-creating-development-data” snapshot.
Restoring to a Snapshot
When we want to get back to a snapshot we can use the vagrant snapshot restore command followed by the name of the snapshot. When this happens any data that hasn’t been saved to a snapshot will be lost.
This process actually shuts down the VM before restoring the snapshot so take that into account whenever a snapshot is restored.
vagrant snapshot restore initial-setup
==> default: Forcing shutdown of VM...
==> default: Restoring the snapshot 'initial-setup'...
==> default: Checking if box 'generic/ubuntu2004' version '3.1.22' is up to date...
==> default: A newer version of the box 'generic/ubuntu2004' for provider 'virtualbox' is
==> default: available! You currently have version '3.1.22'. The latest is version
==> default: '3.5.2'. Run `vagrant box update` to update.
==> default: Resuming suspended VM...
==> default: Booting VM...
==> default: Waiting for machine to boot. This may take a few minutes...
    default: SSH address: 127.0.0.1:2222
    default: SSH username: vagrant
    default: SSH auth method: private key
==> default: Machine booted and ready!
==> default: Machine already provisioned. Run `vagrant provision` or use the `--provision`
==> default: flag to force provisioning. Provisioners marked to run always will still run.
Deleting a Snapshot
Snapshots are costly in terms of performance and drive space so we must clean up the old snapshots using the delete command.
We might need to create a new set of test data. To do that we’ll restore our VM to our “initial-setup” snapshot, make our changes, and create a new snapshot.
vagrant snapshot save after-creating-development-data-newer-data
==> default: Snapshotting the machine as 'after-creating-development-data-newer-data'...
==> default: Snapshot saved! You can restore the snapshot at any time by
==> default: using `vagrant snapshot restore`. You can delete it using
==> default: `vagrant snapshot delete`.
But then we still have our “after-creating-development-data” sitting around using up space. To remove it we can use the vagrant snapshot delete command with the name of the snapshot.
vagrant snapshot delete after-creating-development-data
==> default: Deleting the snapshot 'after-creating-development-data'...
==> default: Snapshot deleted!
Push/Pop
That covers the majority of the snapshot feature but we still haven’t discussed the push and pop commands. These allow us to create a temporary snapshot so we can try something by quickly creating a snapshot and then restoring to the snapshot and deleting it in one command.
This is helpful when we want to test an upgrade inside our development environment (maybe upgrading to a new version of PHP) without worrying about messing up our setup if it goes awry.
To use this command we just call vagrant snapshot push and it will generate a new snapshot that starts with the word “push”.
vagrant snapshot push
==> default: Snapshotting the machine as 'push_1637457855_1093'...
==> default: Snapshot saved! You can restore the snapshot at any time by
==> default: using `vagrant snapshot restore`. You can delete it using
==> default: `vagrant snapshot delete`.
The new snapshot even shows up in the list of snapshots from vagrant snapshot list.
vagrant snapshot list
==> default:
after-creating-development-data-20211122
initial-setup
push_1637457855_1093
When we’re done with whatever we’re doing we can then pop the snapshot which again restores the snapshot and then immediately deletes the snapshot so we’re back to where we started.
vagrant snapshot pop
==> default: Forcing shutdown of VM...
==> default: Restoring the snapshot 'push_1637457855_1093'...
==> default: Deleting the snapshot 'push_1637457855_1093'...
==> default: Snapshot deleted!
==> default: Checking if box 'generic/ubuntu2004' version '3.1.22' is up to date...
==> default: A newer version of the box 'generic/ubuntu2004' for provider 'virtualbox' is
==> default: available! You currently have version '3.1.22'. The latest is version
==> default: '3.5.2'. Run `vagrant box update` to update.
==> default: Resuming suspended VM...
==> default: Booting VM...
==> default: Waiting for machine to boot. This may take a few minutes...
    default: SSH address: 127.0.0.1:2222
    default: SSH username: vagrant
    default: SSH auth method: private key
==> default: Machine booted and ready!
==> default: Machine already provisioned. Run `vagrant provision` or use the `--provision`
==> default: flag to force provisioning. Provisioners marked to run always will still run.
If we check our list of snapshots again we’ll see that it’s gone now.
vagrant snapshot list
==> default:
after-creating-development-data-newer-data
initial-setup
What You Need To Know
- Snapshots provide a method to lock our VMs data at a specific point
- Makes it easier to test change to data
- Vagrant provides this using the
vagrant snapshotcommand vagrant snapshot saveto savevagrant snapshot restoreto go backvagrant snapshot deleteto remove an outdated snapshot

Scott Keck-Warren
Scott is the Director of Technology at WeCare Connect where he strives to provide solutions for his customers needs. He's the father of two and can be found most weekends working on projects around the house with his loving partner.
Top Posts
- Working With Soft Deletes in Laravel (By Example)
- Fixing CMake was unable to find a build program corresponding to "Unix Makefiles"
- Upgrading to Laravel 8.x
- Get The Count of the Number of Users in an AD Group
- Multiple Vagrant VMs in One Vagrantfile
- Fixing the "this is larger than GitHub's recommended maximum file size of 50.00 MB" error
- Changing the Directory Vagrant Stores the VMs In
- Accepting Android SDK Licenses From The OSX Command Line
- Fixing the 'Target class [config] does not exist' Error
- Using Rectangle to Manage MacOS Windows
More In This Series
- What's a Virtual Machine?
- Why Use Vagrant?
- Initializing a Vagrant Development Environment
- Managing A Vagrant Environment's Power State
- How to Reset/Delete A Vagrant Development Environment
- Configuring Our Vagrant Development Environment's Network
- Remotely Accessing Our Vagrant Development Environment (Linux/Ubuntu)
- Syncing Files to Our Vagrant Development Environment
- Customizing the Amount Of RAM in Our Vagrant VMs
- Displaying Our Vagrant VMs User Interface
- Saving Vagrant States Using Snapshots